Table of Contents Page
About This Page
This page allows you to edit the structure and
properties of tables of contents.
You can modify and visualize the structure and order of
elements in a table of contents using the
Table of Contents section.
This section occupies the left-hand portion of the
editor area.
You can modify the properties of specific elements in the
Table of Contents by using the corresponding
Details sections.
These sections appear in the right-hand portion of the
editor area depending on the type of element selected
in the Table of Contents section.
Page Sections
This page is comprised of the following sections:
Table of Contents Section
This section allows you to do the following:
-
Visualize and modify the structure of a table of contents
via addition, removal and reorganization of its elements.
-
Activate the corresponding Details
section used to edit the properties of a specific element
in the table of contents.
-
Find and open existing documentation pages and tables
of contents linked from this table of contents.
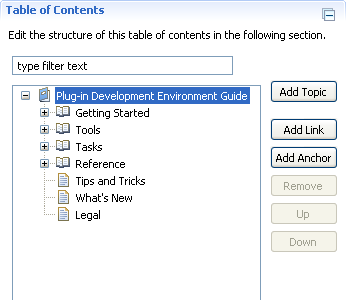
Table of Contents Section Fields
The table of contents tree viewer field displays the
structure of the table of contents as it will appear
in the Help system. This tree viewer allows you to
modify the structure of the table of contents by
reorganizing existing elements or adding new ones
to the tree.
This viewer contains the following kinds of elements:
-
 The book element is the root element of a table of contents.
Select this element to activate the Book Details
section.
The book element is the root element of a table of contents.
Select this element to activate the Book Details
section.
-
 Topics serve as links to Help files, as well as containers for
other elements in the table of contents.
Select a topic to activate the Topic Details
section.
Topics serve as links to Help files, as well as containers for
other elements in the table of contents.
Select a topic to activate the Topic Details
section.
 Links allow you to include elements from other tables of
contents in your table of contents.
Select a link to activate the Link Details
section.
Links allow you to include elements from other tables of
contents in your table of contents.
Select a link to activate the Link Details
section. Anchors allow other tables of contents to specify that their
elements will appear in your table of contents.
Select an anchor to activate the Anchor Details
section.
Anchors allow other tables of contents to specify that their
elements will appear in your table of contents.
Select an anchor to activate the Anchor Details
section.
Table of Contents Section Actions
Click on the Add Topic,
Add Link or Add Anchor
buttons in order to add a new topic, link or anchor to the
table of contents.
These actions are available when any element is selected.
If the selected element is a book or topic element,
the new element will appear as the last child of the
selected element.
Otherwise, the element will appear immediately after the
selected element.
You can also create topic elements by dragging HTML files
and dropping them on the desired location within your table
of contents. The newly added topic directs the user to the
dropped page.
Similarly, you can create link elements by dragging XML files
representing tables of contents and dropping them on the
desired location within your table of contents.
The newly added link will reference the dropped table of
contents.
Click the Remove button to remove an element
from the table of contents.
This action is available for all elements except the book
element.
Note that, in order to maintain the validity of a table of
contents, a topic cannot be removed if it is the only direct
child of the book element.
Click the Up button to move an element up one
position with respect to its siblings.
This action is available for all elements except the book element.
Click the Down button to move an element down
one position with respect to its siblings.
This action is available for all elements except the book element.
You may also move elements within a table of contents by
dragging them and dropping them in the desired locations.
To open the documentation file specified by a table of
contents or a topic, simply double-click on it.
To reveal the documentation file in a resource view, simply
right-click the element and select an option from the
Show In submenu.
To open the table of contents specified by a link, simply
double-click on the link.
To reveal the table of contents in a resource view, simply
right-click the link and select an option from the
Show In submenu.
Book Details Section
The Book Details section allows you to edit
the name, page location and anchor path of this table of
contents.

Book Details Section Fields
Edit the Name field to specify the name
of the book.
Edit the Location field to specify the
location of a page associated with the book.
This page will appear when the user clicks on the book
element in the Help Contents window.
If no page is specified, a default Help page is automatically
generated by the Help system at runtime.
The Anchor field allows you to specify if this
table of contents will be embedded within another table of
contents.
The anchor field takes the path to a table of contents
and the ID of an anchor contained in that table of contents,
separated by a '#' symbol.
When users view the referenced table of contents in the
Help Contents window, the contents of this
table will be displayed at the location of the specified
anchor.
Book Details Section Actions
If the path specified in the Location field
refers to an existing HTML page, then clicking on the
Location hyperlink will open the page in a
default editor.
If the path refers to a file that does not exist, or if the
path is empty, then clicking on the Location
hyperlink opens a New Page Wizard, which
allows you to create HTML pages. In the wizard, the
File name field is automatically populated
with the file name from the Location field
(if specified). If a valid folder path is specified in the
Location field, then this path is
automatically selected in the wizard as the location of the
new file.
Click the Browse button to open the
Page Selection dialog, which allows you to
select an existing HTML page.
The dialog presents a hierarchical view of HTML pages
contained within your workspace.
After a selection is made, the relative path from the project
that contains the table of contents to the selected HTML page
is automatically entered into the Location
field.
Topic Details Section
The Topic Details section allows you to edit
the name and page location of this topic.
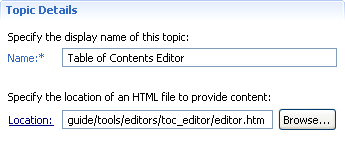
Topic Details Section Fields
Edit the Name field to specify the name of
the topic.
Edit the Location field to specify the
location of a page associated with the topic.
This page will appear when the user clicks on the topic
element in the Help Contents window.
If no page is specified, a default Help page is automatically
generated by the Help system at runtime.
Topic Details Section Actions
If the path specified in the Location field
refers to an existing HTML page, then clicking on the
Location hyperlink will open the page in a
default editor.
If the path refers to a file that does not exist, or if the
path is empty, then clicking on the Location
hyperlink opens a New Page Wizard, which
allows you to create HTML pages.
In the wizard, the File name field is
automatically populated with the file name from the
Location field (if specified).
If a valid folder path is specified in the
Location field, then this path is
automatically selected in the wizard as the location of the
new file.
Click the Browse button to open the
Page Selection dialog, which allows
you to select an existing HTML page.
The dialog presents a hierarchical view of HTML pages
contained within your workspace.
After a selection is made, the relative path from the
project that contains the table of contents to the
selected HTML page is automatically entered into the
Location field.
Link Details Section
The Link Details section allows you to edit
the location of a linked table of contents file.
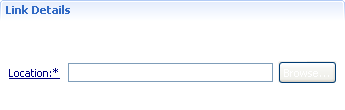
Link Details Section Fields
Edit the Location field to specify the
location of a table of contents file to link.
The elements in the linked file will replace this link in
the table of contents when the user views the table of
contents in the Help Contents window.
Link Details Section Actions
If the path specified in the Location field
refers to an existing table of contents file,
then clicking on the Location hyperlink
will open the page in a default editor.
If the path refers to a file that does not exist, or if the
path is empty, then clicking on the Location
hyperlink opens a New Table of Contents Wizard,
which allows you to create a new table of contents.
In the wizard, the File name field is
automatically populated with the file name from the
Location field (if specified).
If a valid folder path is specified in the
Location field, then this path is
automatically selected in the wizard as the location of the
new file.
Click the Browse button to open the
Table of Contents Selection dialog, which allows you to
select an existing table of contents.
The dialog presents a hierarchical view of tables of contents
contained within your workspace.
After a selection is made, the relative path from the project
to the selected table of contents is automatically entered
into the Location field.
Anchor Details Section
The Anchor Details section allows you to
edit the identifier of this anchor.
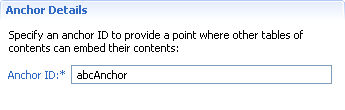
Anchor Details Section Fields
Edit the ID field to specify the identifier
of the anchor.
Relevant Links