In most cases a graphical figure is depicted by one outer ‘main’ graphics algorithm, inside which several other graphics algorithms are located. The outer bounds of this outer ‘main’ graphics algorithm also define the selection-behavior of the graphical figure.
But it is also possible to assemble a shape from overlapping or even distributed graphics algorithms. In such a case it is not so clear anymore, which bounds define the selection-behavior of the graphical figure.
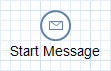
For a better understanding look at the following figure:
Figure: Graphical figure with distributed graphics algorithms (ellipse and text)
This graphical figure consists of an ellipse and a text. For technical reasons there is still an outer invisible rectangle, which contains the ellipse and text. But in this example it would seem strange for the user, if this outer invisible rectangle would define the selection-behavior, meaning that clicking on the invisible rectangle would select it and show the selection-handles along the bounds of the invisible rectangle.
Instead the selection-behavior should work as can be seen in the following figure:
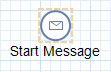
Figure: Selection area is smaller than complete graphical figure
The selection-handles appear only along the borders of the ellipse and not along the borders of the larger invisible rectangle. It is possible to move or resize the circle along these selection-handles (which will implicitly move or resize the complete graphical figure). This makes the ellipse the ‘main’ graphics algorithm, although the ellipse is technically not the outer graphics algorithm of the graphical figure.
Another aspect of the selection-behavior is that the graphical figure shall be selected when the mouse clicks on either the ellipse or the text. When the mouse clicks the text however, then the handle-bounds still appear around the ellipse as described above, and not around the text. This means, that the selection-handles can be shown around a different area, than the area which reacts on the mouse clicks to select the graphical figure.
The following example bases on the box relative anchor we created previously. As you can see the box relative anchor was located completely inside the bounds of the rectangle depicting the EClass.

Figure: Box relative anchor inside bounds of graphical figure
Now we want to change the location of the box relative anchor, so that it exceeds the bounds of the rectangle. This is actually quite typical, that box relative anchors or fix point anchors exceed the bounds of the graphical figure it belongs to.
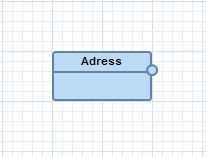
Figure: Box relative anchor exceeds bounds of graphical figure
As already mentioned, for technical reasons a graphics algorithm can never be painted outside the bounds of its parent graphics algorithm. Although it is possible to set the bounds of a graphics algorithm to exceed the bounds of its parent graphics algorithm, it will just be clipped when painting.
You can try that out by changing the bounds of the box relative anchor we created previously:
gaService.setLocationAndSize(rectangle, -8, -4, 16, 8);
As this doesn’t work, we have to change the structure of the graphics algorithms for the EClass. The outer graphics algorithm shall be an invisible rectangle, which contains the rectangle depicting the EClass. The size of the invisible rectangle equals the size of the rectangle depicting the EClass, plus the space needed for the box relative anchor at its right side. You can see the bounds of the invisible rectangle when you select the graphical figure:
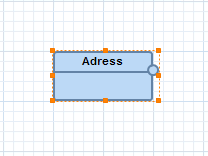
Figure: Selection-handles around the invisible rectangle
The invisible rectangle has to be created in the add method of the add feature, as explained in the following code snippet. Additionally the bounds of the box relative anchor have to be set differently. Note, that the expanded width of the invisible rectangle is set in a static field, because it also has to be used in calculations outside this class.
// the additional size of the invisible
rectangle at the right border
// (this also equals the half width of
the anchor to paint there)
public static
final int INVISIBLE_RECT_RIGHT
= 6;
public PictogramElement
add(IAddContext context) {
EClass addedClass = (EClass)
context.getNewObject();
Diagram targetDiagram = (Diagram)
context.getTargetContainer();
// CONTAINER SHAPE WITH ROUNDED RECTANGLE
IPeCreateService peCreateService = Graphiti.getPeCreateService();
ContainerShape containerShape =
peCreateService.createContainerShape(targetDiagram,
true);
// check whether the context has a size (e.g. from
a create feature)
// otherwise define a default size
for the shape
int
width = context.getWidth() <= 0 ? 100 : context.getWidth();
int height = context.getHeight() <= 0 ? 50
: context.getHeight();
RoundedRectangle
roundedRectangle; // need to access it later
IGaService gaService = Graphiti.getGaService();
{
// create invisible outer rectangle expanded by
// the width needed for the anchor
Rectangle invisibleRectangle =
gaService.createInvisibleRectangle(containerShape);
gaService.setLocationAndSize(invisibleRectangle,
context.getX(), context.getY(), width + INVISIBLE_RECT_RIGHT,
height);
// create and set visible rectangle inside invisible
rectangle
roundedRectangle
=
gaService.createRoundedRectangle(invisibleRectangle, 5, 5);
roundedRectangle.setForeground(manageColor(E_CLASS_FOREGROUND));
roundedRectangle.setBackground(manageColor(E_CLASS_BACKGROUND));
roundedRectangle.setLineWidth(2);
gaService.setLocationAndSize(roundedRectangle, 0,
0, width, height);
// create link and wire it
link(containerShape, addedClass);
}
// ... EXISTING CODING ...
// add a chopbox anchor to the shape
peCreateService.createChopboxAnchor(containerShape);
// create an additional box relative anchor
at middle-right
BoxRelativeAnchor boxAnchor
=
peCreateService.createBoxRelativeAnchor(containerShape);
boxAnchor.setRelativeWidth(1.0);
boxAnchor.setRelativeHeight(0.38); //use golden
section
// anchor references visible rectangle instead of
invisible rectangle
boxAnchor.setReferencedGraphicsAlgorithm(roundedRectangle);
// assign a graphics algorithm for the box relative
anchor
Ellipse ellipse =
gaService.createEllipse(boxAnchor);
ellipse.setForeground(manageColor(E_CLASS_FOREGROUND));
ellipse.setBackground(manageColor(E_CLASS_BACKGROUND));
ellipse.setLineWidth(2);
// anchor is located on the right border of the visible
rectangle
// and touches the border of the invisible
rectangle
int
w = INVISIBLE_RECT_RIGHT;
gaService.setLocationAndSize(ellipse, -w, -w, 2 * w, 2 * w);
// call the layout feature
layoutPictogramElement(containerShape);
return containerShape;
}
Next we have to change the layout method of the layout feature. Previously it adjusted the size of the inner graphics algorithms (line and text) in relation to the container graphics algorithm (visible rectangle). Now it has to adjust the size of the inner graphics algorithms (visible rectangle, line and text) in relation to the container graphics algorithm (invisible rectangle).
The implementation can be seen in the following code-snippet:
public boolean layout(ILayoutContext
context) {
boolean anythingChanged
= false;
ContainerShape
containerShape =
(ContainerShape)
context.getPictogramElement();
GraphicsAlgorithm containerGa
= containerShape.getGraphicsAlgorithm();
// the containerGa is the invisible rectangle
// containing the visible rectangle as its (first and only) child
GraphicsAlgorithm rectangle =
containerGa.getGraphicsAlgorithmChildren().get(0);
// height of invisible rectangle
if (containerGa.getHeight() <
MIN_HEIGHT) {
containerGa.setHeight(MIN_HEIGHT);
anythingChanged = true;
}
// height of visible
rectangle (same as invisible rectangle)
if (rectangle.getHeight() != containerGa.getHeight())
{
rectangle.setHeight(containerGa.getHeight());
anythingChanged = true;
}
// width of invisible
rectangle
if (containerGa.getWidth()
< MIN_WIDTH) {
containerGa.setWidth(MIN_WIDTH);
anythingChanged = true;
}
// width of visible
rectangle (smaller than invisible rectangle)
int rectangleWidth =
containerGa.getWidth()
- TutorialAddEClassFeature.INVISIBLE_RECT_RIGHT;
if (rectangle.getWidth() != rectangleWidth)
{
rectangle.setWidth(rectangleWidth);
anythingChanged = true;
}
// width of text
and line (same as visible rectangle)
Iterator<Shape> iter = containerShape.getChildren().iterator();
while (iter.hasNext()) {
Shape shape = iter.next();
GraphicsAlgorithm graphicsAlgorithm = shape.getGraphicsAlgorithm();
IGaService gaService = Graphiti.getGaService();
IDimension size =
gaService.calculateSize(graphicsAlgorithm);
if (rectangleWidth != size.getWidth()) {
if (graphicsAlgorithm
instanceof Polyline) {
Polyline polyline = (Polyline) graphicsAlgorithm;
Point secondPoint = polyline.getPoints().get(1);
Point newSecondPoint =
gaService.createPoint(rectangleWidth,
secondPoint.getY());
polyline.getPoints().set(1, newSecondPoint);
anythingChanged = true;
} else {
gaService.setWidth(graphicsAlgorithm,
rectangleWidth);
anythingChanged = true;
}
}
}
return anythingChanged;
}
Start the editor and create a new EClass. Verify that the EClass and its selection-handles look similar to the figures above.
As you can see above the selection-handles of the EClass are around the invisible rectangle.
This is not a good selection-behavior, because the user considers the visible rectangle as the ‘main’ graphics algorithm and doesn’t care about the extra space needed to show the anchor. This also means that when resizing/moving the EClass, this should be done on the visible rectangle and not the invisible rectangle.
In the following we want to change the selection behavior in a way that the selection-handles appear directly around the visible rectangle, as you can see in the following figure:
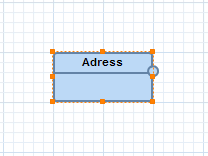
Figure: Selection-handles around the visible rectangle
Additionally we want to define the visible rectangle as the selection-area, which activates the selection when the mouse clicks into it. So a mouse click on the invisible rectangle outside the visible rectangle will no longer activate the selection.
Selection areas are defined in the tool behavior provider.
If you didn’t do so already you must first create a tool behavior provider and add it to the diagram type provider as described here.
The following methods of the tool behavior provider must be overwritten:
In this example we want to return the visible rectangle in both methods.
You can see the complete implementation of the selection area here:
@Override
public GraphicsAlgorithm[]
getClickArea(PictogramElement pe) {
IFeatureProvider
featureProvider = getFeatureProvider();
Object bo
= featureProvider.getBusinessObjectForPictogramElement(pe);
if (bo instanceof
EClass) {
GraphicsAlgorithm
invisible = pe.getGraphicsAlgorithm();
GraphicsAlgorithm rectangle =
invisible.getGraphicsAlgorithmChildren().get(0);
return new GraphicsAlgorithm[] { rectangle
};
}
return
super.getClickArea(pe);
}
@Override
public GraphicsAlgorithm getSelectionBorder(PictogramElement
pe) {
if (pe
instanceof ContainerShape) {
GraphicsAlgorithm invisible = pe.getGraphicsAlgorithm();
if (!invisible.getLineVisible()) {
EList<GraphicsAlgorithm> graphicsAlgorithmChildren =
invisible.getGraphicsAlgorithmChildren();
if (!graphicsAlgorithmChildren.isEmpty()) {
return graphicsAlgorithmChildren.get(0);
}
}
}
return super.getSelectionBorder(pe);
}
Note: This change is incompatible with diagrams created in earlier stages of the tutorial. You will get an exception, when opening these diagrams.
Start the editor and create a new EClass. Click on the visible rectangle and verify that the selection-handles are only around the visible rectangle. Click slightly right of the visible rectangle on the invisible rectangle and verify that the EClass becomes deselected.