Context buttons allow adding actions as small, automatically appearing icons for each pictogram element in the diagram.
They are shown along the borders of a pictogram element when the mouse is positioned on that pictogram element. They are hidden again when the mouse is positioned outside the area built by the pictogram element and the context buttons.
Context buttons can provide the same functionality as a context menu, but in a nicer and quicker way: the context buttons are shown immediately. Another advantage of context buttons over context menus is, that each context button can have several drag and drop features, which get activated when the user drags from a context button and drops onto the canvas or another object.
Context buttons are defined in the tool behavior provider.
If you didn’t do so already you must first create a tool behavior provider and add it to the diagram type provider as described here.
There is one method of the tool behavior provider to overwrite:
The method getContextButtonPad has to return the context buttons for the given context (which implement IContextButtonEntry).
There are different groups of context buttons:
The following restrictions are defined by usability engineers of SAP AG (but currently not checked technically): there can be 0-3 generic context buttons, 0-5 domain specific context buttons and 0-1 collapse context button.
The functionality of context buttons is always provided by features.
Each context button can have one click-feature, which is executed when clicking the context-button, and/or several drag & drop features, which are executed when the user starts dragging a connection from the context button. If several drag & drop features are available, a context-menu will be offered to the user when he drops the connection, and he can choose the feature to execute.
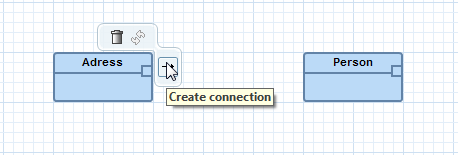
In this example we want to create one context button, which offers all available create connection features as drag & drop features, but has no click-feature. Additionally, we implement a collapse context button, which will pop up a message, that it has not a final implementation.
Figure: A context button, which the user can click or start drag & drop from it
Figure: The user started dragging from the context button
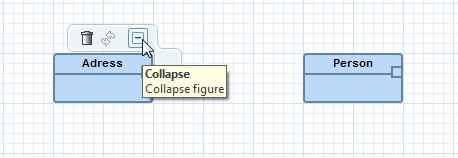
Figure: A context button, which the user can click
You can see the complete implementation of the context and collapse buttons here:
@Override
public IContextButtonPadData
getContextButtonPad(
IPictogramElementContext context) {
IContextButtonPadData
data = super.getContextButtonPad(context);
PictogramElement
pe = context.getPictogramElement();
// 1. set the generic context buttons
// note, that we do not add 'remove' (just as an example)
setGenericContextButtons(data, pe, CONTEXT_BUTTON_DELETE
|
CONTEXT_BUTTON_UPDATE);
// 2. set the collapse button
// simply use a dummy custom feature (senseless example)
CustomContext cc = new CustomContext(new
PictogramElement[] { pe });
ICustomFeature[] cf =
getFeatureProvider().getCustomFeatures(cc);
for (int i = 0;
i < cf.length; i++) {
ICustomFeature iCustomFeature = cf[i];
if (iCustomFeature instanceof
TutorialCollapseDummyFeature) {
IContextButtonEntry collapseButton = ContextEntryHelper.
createCollapseContextButton(true, iCustomFeature,
cc);
data.setCollapseContextButton(collapseButton);
break;
}
}
// 3. add one domain specific
context-button, which offers all
// available connection-features
as drag&drop features...
// 3.a. create new CreateConnectionContext
CreateConnectionContext ccc = new CreateConnectionContext();
ccc.setSourcePictogramElement(pe);
Anchor anchor =
null;
if (pe instanceof Anchor) {
anchor = (Anchor) pe;
} else
if (pe instanceof AnchorContainer) {
// assume, that our shapes always have chopbox anchors
anchor = Graphiti.getPeService()
.getChopboxAnchor((AnchorContainer) pe);
}
ccc.setSourceAnchor(anchor);
// 3.b. create context button
and add all applicable features
ContextButtonEntry
button = new ContextButtonEntry(null,
context);
button.setText("Create
connection");
button.setIconId(MyTutorialImageProvider.IMG_EREFERENCE);
ICreateConnectionFeature[] features =
getFeatureProvider().getCreateConnectionFeatures();
for (ICreateConnectionFeature feature : features)
{
if
(feature.isAvailable(ccc) && feature.canStartConnection(ccc))
button.addDragAndDropFeature(feature);
}
// 3.c. add context button, if it contains at least
one feature
if
(button.getDragAndDropFeatures().size() > 0) {
data.getDomainSpecificContextButtons().add(button);
}
return
data;
}
The implementation of MyTutorialImageProvider can be found here. The implementation of the TutorialCollapseDummyFeature can be found at the end of this page.
The context button entries contain information about icon, display text and tooltip description.
The positioning of the context buttons can be influenced by changing the rectangle around which the context buttons are placed (see getPadLocation). By default the selection area is used (see selection behavior) if defined, or otherwise the bounds of the pictogram elements main graphics algorithm are used.
Note that previously we implemented one create connection feature which allows creating an association between two EClasses.
Now start the editor and test this new context button:
Note, that our implementation of the create connection feature does not allow a connection, if the source and target business object are identical. If you have two different shapes associated with the same business object (e.g. via copy & paste), then creating a connection between them is not possible.
package org.eclipse.graphiti.examples.tutorial.features;
public class TutorialCollapseDummyFeature
extends AbstractCustomFeature {
public TutorialCollapseDummyFeature(IFeatureProvider
fp) {
super(fp);
}
@Override
public boolean canExecute(ICustomContext context)
{
boolean ret = false;
PictogramElement[] pes = context.getPictogramElements();
if (pes != null
&& pes.length == 1) {
Object bo = getBusinessObjectForPictogramElement(pes[0]);
if (bo instanceof
EClass) {
ret = true;
}
}
return ret;
}
@Override
public String getName() {
return "Collapse";
}
@Override
public String getDescription() {
return "Collapse Figure";
}
@Override
public String getImageId() {
return IPlatformImageConstants.IMG_EDIT_COLLAPSE;
}
@Override
public boolean isAvailable(IContext context)
{
return true;
}
@Override
public void execute(ICustomContext context)
{
MessageDialog.openInformation(PlatformUI.getWorkbench()
.getActiveWorkbenchWindow().getShell(), "Information",
"The 'Collapse Feature' is intentionally not implemented
yet.");
}
}
Finally the feature provider has to deliver our newly created custom feature (overwrite the method getCustomFeatures(..)).
This implementation can be seen here:
@Override
public ICustomFeature[]
getCustomFeatures(ICustomContext context) {
return new ICustomFeature[]
{ new TutorialRenameEClassFeature(this),
new TutorialDrillDownEClassFeature(this),
new TutorialAssociateDiagramEClassFeature(this),
new TutorialCollapseDummyFeature(this)};
}
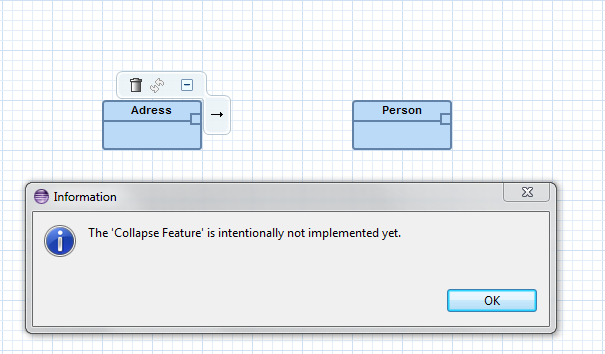
Figure: Clicking the collapse button